Shell脚本的执行方式详解
|
当Shell脚本运行时,它会先查找系统环境变量ENV,该变量指定了环境文件(加载顺序通常是/etc/profile、~/.bash_profile、~/.bashrc、/etc/bashrc等),在加载了上述环境变量文件后,Shell就开始执行Shell脚本中的内容。
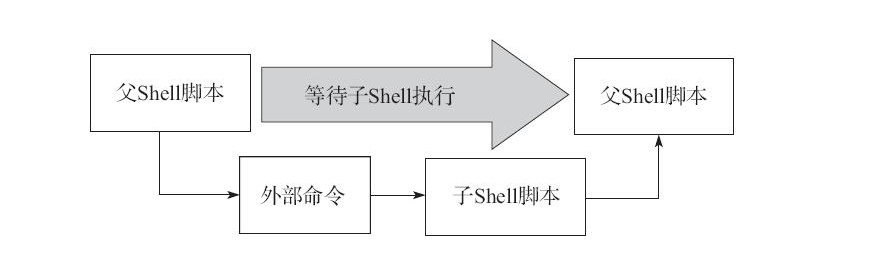
Shell脚本是从上至下、从左至右依次执行每一行的命令及语句的,即执行完了一个命令后再执行下一个,如果在Shell脚本中遇到子脚本(即脚本嵌套)时,就会先执行子脚本的内容,完成后再返回父脚本继续执行父脚本内后续的命令及语句。 通常情况下,在执行Shell脚本时,会向系统内核请求启动一个新的进程,以便在该进程中执行脚本的命令及子Shell脚本,基本流程如图:
Shell脚本的执行通常可以采用以下几种方式: 1)bash script-name或sh script-name这是当脚本文件本身没有可执行权限(即文件权限属性x位为-号)时常使用的方法,或者脚本文件开头没有指定解释器时需要使用的方法; 举例说明: [[email?protected] ~]# vim test.sh echo ‘this is a shell scripts!‘ [[email?protected] ~]# sh test.sh this is a shell scripts! [[email?protected] ~]# bash test.sh this is a shell scripts! 2)path/script-name或./script-name指在当前路径下执行脚本(脚本需要有执行权限),需要将脚本文件的权限先改为可执行(即文件权限属性加x位),具体方法为chmod+x script-name。然后通过脚本绝对路径或相对路径就可以直接执行脚本了; 举例说明: [[email?protected] ~]# ./test.sh -bash: ./test.sh: 权限不够 [[email?protected] ~]# chmod u+x test.sh [[email?protected] ~]# ./test.sh this is a shell scripts! 这种方法比较麻烦一些!每次编写完脚本都必须给脚本一个执行的权限,否则将会提示“权限不够”的错误。 3)source script-name或.script-name这种方法通常是使用source或“.”(点号)读入或加载指定的Shell脚本文件(如san.sh),然后,依次执行指定的Shell脚本文件san.sh中的所有语句。这些语句将在当前父Shell脚本father.sh进程中运行(其他几种模式都会启动新的进程执行子脚本)。因此,使用source或“.”可以将san.sh自身脚本中的变量值或函数等的返回值传递到当前父Shell脚本father.sh中使用。 举例说明: [[email?protected] ~]# chmod u-x test.sh [[email?protected] ~]# ll test.sh -rw-r--r--. 1 root root 32 8月 26 03:09 test.sh [[email?protected] ~]# . test.sh this is a shell scripts! [[email?protected] ~]# source test.sh this is a shell scripts! 4)sh<script-name或cat scripts-name|sh同样适用于bash,不过这种用法不是很常见,但有时也可以有出奇制胜的效果,例如:不用循环语句来实现精简开机自启动服务的案例,就是通过将所有字符串拼接为命令的形式,然后经由管道交给bash操作; 举例说明: [[email?protected] ~]# ll test.sh -rw-r--r--. 1 root root 32 8月 26 03:09 test.sh [[email?protected] ~]# sh<test.sh this is a shell scripts! [[email?protected] ~]# cat test.sh|bash this is a shell scripts! 一个简单的例子明白第三种执行方式的特殊性: [[email?protected] ~]# echo ‘user=`whoami`‘ > test2.sh [[email?protected] ~]# cat test2.sh user=`whoami` [[email?protected] ~]# sh test2.sh [[email?protected] ~]# echo $user [[email?protected] ~]# . test2.sh [[email?protected] ~]# echo $user root 本人亲自尝试得出的结论有三点:
(编辑:李大同) 【声明】本站内容均来自网络,其相关言论仅代表作者个人观点,不代表本站立场。若无意侵犯到您的权利,请及时与联系站长删除相关内容! |