Linux系统部署YUM远程仓库及NFS共享服务
|
YUM概述
YUM基于 可以自动解决依赖关系 所有软件包由集中的 软件仓库的提供方式
本地目录: RPM软件包的来源
第三方组织发布的 用户自定义的 构建CentOS 7软件仓库
通过
在软件仓库中加入非官方RPM包组包括存在依赖关系的所有RPM包 使用 查看YUM软件包
更新YUM软件包
Demo搭建远程YUM仓库1、在 [[email?protected] ~]# hostnamectl set-hostname demo01 [[email?protected] ~]# su [[email?protected] ~]# [[email?protected] ~]# hostnamectl set-hostname demo02 [[email?protected] ~]# su [[email?protected] ~]# 2、在 [[email?protected] ~]# df -hT //查看磁盘信息,看镜像文件是否添加至光驱 文件系统 类型 容量 已用 可用 已用% 挂载点 /dev/sda2 xfs 20G 3.3G 17G 17% / devtmpfs devtmpfs 898M 0 898M 0% /dev tmpfs tmpfs 912M 0 912M 0% /dev/shm tmpfs tmpfs 912M 9.0M 903M 1% /run tmpfs tmpfs 912M 0 912M 0% /sys/fs/cgroup /dev/sda5 xfs 10G 37M 10G 1% /home /dev/sda1 xfs 6.0G 174M 5.9G 3% /boot tmpfs tmpfs 183M 12K 183M 1% /run/user/42 tmpfs tmpfs 183M 24K 183M 1% /run/user/0 /dev/sr0 iso9660 4.3G 4.3G 0 100% /run/media/root/CentOS 7 x86_64 //读取镜像文件 [[email?protected] ~]# mount /dev/sr0 /mnt //将镜像文件挂载至mnt目录 mount: /dev/sr0 写保护,将以只读方式挂载 [[email?protected] ~]# ls /mnt //成功挂载 CentOS_BuildTag EULA images LiveOS repodata RPM-GPG-KEY-CentOS-Testing-7 EFI GPL isolinux Packages RPM-GPG-KEY-CentOS-7 TRANS.TBL 3、在 [[email?protected] ~]# yum install vsftpd -y 已加载插件:fastestmirror,langpacks Loading mirror speeds from cached hostfile * base: mirrors.zju.edu.cn * extras: mirrors.zju.edu.cn * updates: mirrors.zju.edu.cn 正在解决依赖关系 --> 正在检查事务 ---> 软件包 vsftpd.x86_64.0.3.0.2-25.el7 将被 安装 ...//省略部分内容... 正在安装 : vsftpd-3.0.2-25.el7.x86_64 1/1 验证中 : vsftpd-3.0.2-25.el7.x86_64 1/1 已安装: vsftpd.x86_64 0:3.0.2-25.el7 完毕! [[email?protected] ~]# ls /var //查看目录信息 account cache db ftp gopher lib lock mail opt run target yp adm crash empty games kerberos local log nis preserve spool tmp //成功创建FTP站点 4、先在 [[email?protected] ~]# cd /var/ftp //进入FTP站点目录中 [[email?protected] ftp]# ls //查看目录信息 pub [[email?protected] ftp]# mkdir centos7 //创建目录,作为YUM仓库源点 [[email?protected] ftp]# ls //查看是否创建成功 centos7 pub [[email?protected] ftp]# cp -rf /mnt/* centos7/& //将挂载的镜像文件全部复制入YUM仓库源点目录,并在后台执行 [1] 2997 [[email?protected] ftp]# mkdir other //创建目录,作为扩展目录 [[email?protected] ftp]# ls //查看是否创建成功 centos7 other pub [[email?protected] ftp]# createrepo -g /mnt/repodata/repomd.xml other/ //使用createrepo创建扩展数据文件 Saving Primary metadata Saving file lists metadata Saving other metadata Generating sqlite DBs Sqlite DBs complete [1]+ 完成 cp -i -rf /mnt/* centos7/ //复制镜像文件任务完成 [[email?protected] ftp]# ls centos7/ //查看文件是否成功复制入目录 CentOS_BuildTag EULA images LiveOS repodata RPM-GPG-KEY-CentOS-Testing-7 EFI GPL isolinux Packages RPM-GPG-KEY-CentOS-7 TRANS.TBL [[email?protected] ftp]# cd other/repodata/ //进入扩展数据文件目录 [[email?protected] repodata]# ls //查看数据文件是否成功创建 01a3b489a465bcac22a43492163df43451dc6ce47d27f66de289756b91635523-filelists.sqlite.bz2 401dc19bda88c82c403423fb835844d64345f7e95f5b9835888189c03834cc93-filelists.xml.gz 5dc1e6e73c84803f059bb3065e684e56adfc289a7e398946574d79dac6643945-primary.sqlite.bz2 5f62201963ee83e178738d9f88078560377cc06f972a4c0094ab3be00cae515f-repomd.xml 6bf9672d0862e8ef8b8ff05a2fd0208a922b1f5978e6589d87944c88259cb670-other.xml.gz 7c36572015e075add2b38b900837bcdbb8a504130ddff49b2351a7fc0affa3d4-other.sqlite.bz2 c48538ac0f65ece36eb71d41b76f1eb1f98c58cc26777348490feaed8f38ab56-repomd.xml.gz dabe2ce5481d23de1f4f52bdcfee0f9af98316c9e0de2ce8123adeefa0dd08b9-primary.xml.gz repomd.xml 5、开启 [[email?protected] repodata]# cd ~ //回到家目录 [[email?protected] ~]# systemctl start vsftpd //开启FTP服务 [[email?protected] ~]# netstat -ntap | grep 21 //查看21端口是否开启 tcp 0 0 127.0.0.1:6010 0.0.0.0:* LISTEN 1621/sshd: [email?protected] tcp 0 0 192.168.144.133:22 192.168.144.1:49340 ESTABLISHED 1621/sshd: [email?protected] tcp6 0 0 :::21 :::* LISTEN 3183/vsftpd //成功开启 tcp6 0 0 ::1:6010 :::* LISTEN 1621/sshd: [email?protected] [[email?protected] ~]# systemctl stop firewalld.service //关闭防火墙功能 [[email?protected] ~]# setenforce 0 //关闭增强性安全功能 6、在客户端 [[email?protected] ~]# yum install ftp -y //安装FTP工具 已加载插件:fastestmirror,langpacks base | 3.6 kB 00:00:00 extras | 3.4 kB 00:00:00 updates | 3.4 kB 00:00:00 (1/4): base/7/x86_64/group_gz | 166 kB 00:00:25 ...//省略部分内容... 正在安装 : ftp-0.17-67.el7.x86_64 1/1 验证中 : ftp-0.17-67.el7.x86_64 1/1 已安装: ftp.x86_64 0:0.17-67.el7 完毕! [[email?protected] ~]# ftp 192.168.144.133 //访问服务器FTP站点 Connected to 192.168.144.133 (192.168.144.133). 220 (vsFTPd 3.0.2) Name (192.168.144.133:root): ftp //提示输入用户名,使用匿名用户访问 331 Please specify the password. Password: //提示输入密码,匿名用户没有密码,直接回车即可 230 Login successful. Remote system type is UNIX. Using binary mode to transfer files. //成功访问 ftp> ls //查看服务器FTP站点信息 227 Entering Passive Mode (192,168,144,133,94,209). 150 Here comes the directory listing. drwxr-xr-x 8 0 0 220 Sep 17 09:00 centos7 //建立的YUM源点目录 drwxr-xr-x 3 0 0 22 Sep 17 09:00 other //扩展数据信息 drwxr-xr-x 2 0 0 6 Oct 30 2018 pub 226 Directory send OK. ftp> bye //退出访问 221 Goodbye. 7、在客户端中进入本地 [[email?protected] ~]# cd /etc/yum.repos.d/ //进入本地yum仓库
[[email?protected] yum.repos.d]# ls //查看
CentOS-Base.repo CentOS-Debuginfo.repo CentOS-Media.repo CentOS-Vault.repo
CentOS-CR.repo CentOS-fasttrack.repo CentOS-Sources.repo
[[email?protected] yum.repos.d]# mkdir bak //创建新目录
[[email?protected] yum.repos.d]# mv *.repo bak/ //将所有后缀为repo文件移动到bak目录中
[[email?protected] yum.repos.d]# ls //查看目录信息
bak
[[email?protected] yum.repos.d]# ls bak/ //查看bak目录信息
CentOS-Base.repo CentOS-Debuginfo.repo CentOS-Media.repo CentOS-Vault.repo
CentOS-CR.repo CentOS-fasttrack.repo CentOS-Sources.repo //成功移入bak目录
[[email?protected] yum.repos.d]# yum clean all //清除yum缓存
已加载插件:fastestmirror,langpacks
Loading mirror speeds from cached hostfile
There are no enabled repos.
Run "yum repolist all" to see the repos you have.
To enable Red Hat Subscription Management repositories:
subscription-manager repos --enable <repo>
To enable custom repositories:
yum-config-manager --enable <repo>
[[email?protected] yum.repos.d]# yum install httpd //使用yum安装http服务
已加载插件:fastestmirror,langpacks
Loading mirror speeds from cached hostfile
There are no enabled repos.
Run "yum repolist all" to see the repos you have.
To enable Red Hat Subscription Management repositories:
subscription-manager repos --enable <repo>
To enable custom repositories:
yum-config-manager --enable <repo> //无法安装
8、在客户端 [[email?protected] yum.repos.d]# vim centos7.repo //编辑yum配置文件 [base] name=centos7.Packages baseurl=ftp://192.168.144.133/centos7 //编写yum仓库软件位置 enabled=1 gpgcheck=1 //开启密钥验证 gpgkey=ftp://192.168.144.133/centos7/RPM-GPG-KEY-CentOS-7 //输入密钥位置 [other] name=other.Packages baseurl=ftp://192.168.144.133/other //编写yum仓库扩展数据文件位置 enabled=1 gpgcheck=0 ~ ~ ~ ~ :wq //完成后保存退出 9、使用 [[email?protected] yum.repos.d]# yum list //重新加载yum仓库 已加载插件:fastestmirror,langpacks Loading mirror speeds from cached hostfile ...//省略部分内容... [[email?protected] yum.repos.d]# yum install httpd -y //使用yum安装http服务 已加载插件:fastestmirror,langpacks Loading mirror speeds from cached hostfile 正在解决依赖关系 --> 正在检查事务 ---> 软件包 httpd.x86_64.0.2.4.6-67.el7.centos 将被 安装 ...//省略部分内容... 已安装: httpd.x86_64 0:2.4.6-67.el7.centos 作为依赖被安装: apr.x86_64 0:1.4.8-3.el7 apr-util.x86_64 0:1.5.2-6.el7 httpd-tools.x86_64 0:2.4.6-67.el7.centos mailcap.noarch 0:2.1.41-2.el7 完毕! //成功安装 NFS共享服务Network File System 网络文件系统依赖于RPC(远端过程调用) 需安装nsf-utils、rpcbind软件包 系统服务nfs、rpcbind 共享配置文件:/etc/exports 使用NFS发布共享资源安装
查看服务命令
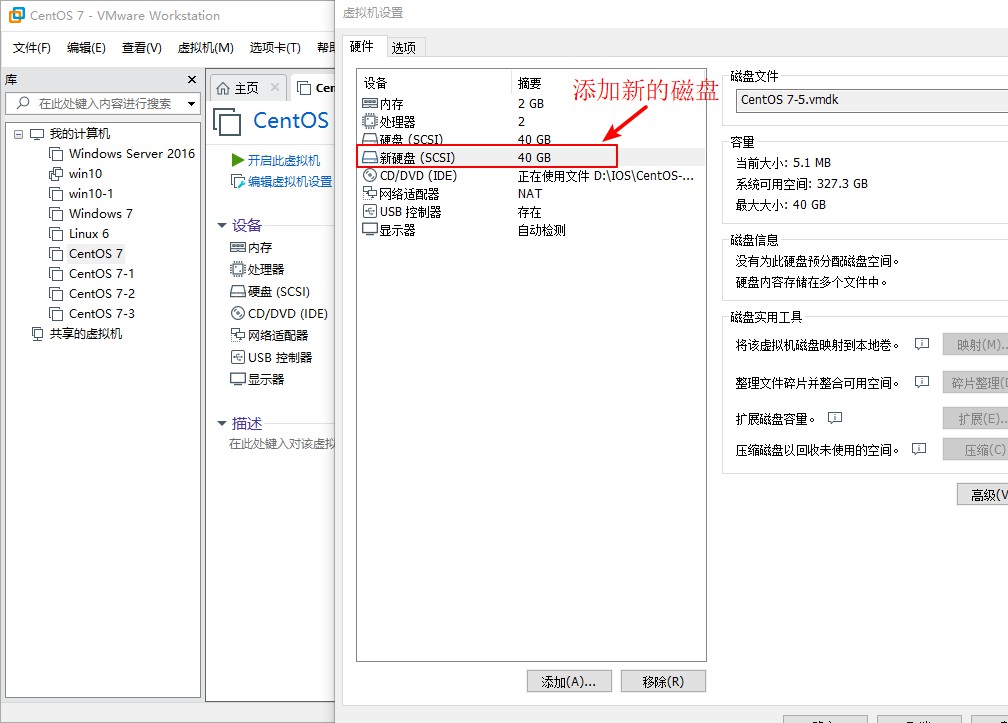
Demo搭建NFS服务1、在
[[email?protected] ~]# hostnamectl set-hostname tast01
[[email?protected] ~]# su
[[email?protected] ~]#
[[email?protected] ~]# hostnamectl set-hostname tast02 [[email?protected] ~]# su [[email?protected] ~]# 2、在服务器中新添加的磁盘进行分区处理,格式化磁盘,然后将磁盘设置自动挂载在 [[email?protected] ~]# ls /dev/ //查看设备目录,看是否读取新添加的硬盘
agpgart hugepages port sr0 tty23 tty42 tty61 vcs5
autofs hwrng ppp stderr tty24 tty43 tty62 vcs6
block initctl ptmx stdin tty25 tty44 tty63 vcsa
bsg input pts stdout tty26 tty45 tty7 vcsa1
btrfs-control kmsg random tty tty27 tty46 tty8 vcsa2
bus log raw tty0 tty28 tty47 tty9 vcsa3
cdrom loop-control rtc tty1 tty29 tty48 ttyS0 vcsa4
char lp0 rtc0 tty10 tty3 tty49 ttyS1 vcsa5
console lp1 sda tty11 tty30 tty5 ttyS2 vcsa6
core lp2 sda1 tty12 tty31 tty50 ttyS3 vfio
cpu lp3 sda2 tty13 tty32 tty51 uhid vga_arbiter
cpu_dma_latency mapper sda3 tty14 tty33 tty52 uinput vhci
crash mcelog sda4 tty15 tty34 tty53 urandom vhost-net
disk mem sda5 tty16 tty35 tty54 usbmon0 vmci
dri mqueue sdb tty17 tty36 tty55 usbmon1 vsock
fb0 net sg0 tty18 tty37 tty56 usbmon2 zero
fd network_latency sg1 tty19 tty38 tty57 vcs
full network_throughput sg2 tty2 tty39 tty58 vcs1
fuse null shm tty20 tty4 tty59 vcs2
hidraw0 nvram snapshot tty21 tty40 tty6 vcs3
hpet oldmem snd tty22 tty41 tty60 vcs4
[[email?protected] ~]# fdisk /dev/sdb //创建磁盘分区
欢迎使用 fdisk (util-linux 2.23.2)。
更改将停留在内存中,直到您决定将更改写入磁盘。
使用写入命令前请三思。
Device does not contain a recognized partition table
使用磁盘标识符 0xa928f95d 创建新的 DOS 磁盘标签。
命令(输入 m 获取帮助):n
Partition type:
p primary (0 primary,0 extended,4 free)
e extended
Select (default p):
Using default response p
分区号 (1-4,默认 1):
起始 扇区 (2048-83886079,默认为 2048):
将使用默认值 2048
Last 扇区,+扇区 or +size{K,M,G} (2048-83886079,默认为 83886079):
将使用默认值 83886079
分区 1 已设置为 Linux 类型,大小设为 40 GiB
命令(输入 m 获取帮助):w
The partition table has been altered!
Calling ioctl() to re-read partition table.
正在同步磁盘。
[[email?protected] ~]# mkfs.xfs /dev/sdb1 //格式化磁盘信息
meta-data=/dev/sdb1 isize=512 agcount=4,agsize=2621376 blks
= sectsz=512 attr=2,projid32bit=1
= crc=1 finobt=0,sparse=0
data = bsize=4096 blocks=10485504,imaxpct=25
= sunit=0 swidth=0 blks
naming =version 2 bsize=4096 ascii-ci=0 ftype=1
log =internal log bsize=4096 blocks=5119,version=2
= sectsz=512 sunit=0 blks,lazy-count=1
realtime =none extsz=4096 blocks=0,rtextents=0
[[email?protected] ~]# vim /etc/fstab //进入编辑自动挂载配置文件
#
# /etc/fstab
# Created by anaconda on Sat Aug 10 03:42:29 2019
#
# Accessible filesystems,by reference,are maintained under ‘/dev/disk‘
# See man pages fstab(5),findfs(8),mount(8) and/or blkid(8) for more info
#
UUID=729c9a26-dfdc-40f9-ae91-1ade55be51bb / xfs defaults 0 0
UUID=9559d8d9-8f6a-4adb-a41f-02862b167946 /boot xfs defaults 0 0
UUID=5ed35562-b598-43e0-8f8a-db788aa06d40 /home xfs defaults 0 0
UUID=bcc2cc5c-4f4e-4e1d-b4e1-245cfed5cf9d swap swap defaults 0 0
/dev/sdb1/ /mnt xfs defaults 0 0 //设置自动挂载sdb1磁盘
~
~
~
~
:wq //保存退出
[[email?protected] ~]# mount -a //加载自动挂载文件
[[email?protected] ~]# df -h //查看磁盘信息
文件系统 容量 已用 可用 已用% 挂载点
/dev/sda2 20G 3.3G 17G 17% /
devtmpfs 898M 0 898M 0% /dev
tmpfs 912M 0 912M 0% /dev/shm
tmpfs 912M 9.0M 903M 1% /run
tmpfs 912M 0 912M 0% /sys/fs/cgroup
/dev/sda5 10G 37M 10G 1% /home
/dev/sda1 6.0G 174M 5.9G 3% /boot
tmpfs 183M 12K 183M 1% /run/user/42
tmpfs 183M 0 183M 0% /run/user/0
/dev/sdb1 40G 33M 40G 1% /mnt //成功挂载
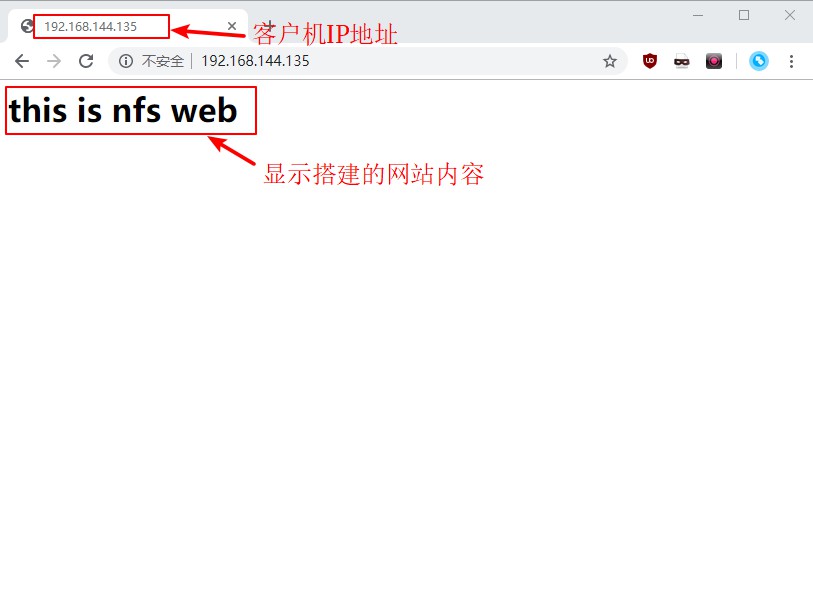
3、在服务器中安装 [[email?protected] ~]# yum install nfs-utlis rpcbind -y //安装软件 已加载插件:fastestmirror,langpacks base | 3.6 kB 00:00:00 extras | 3.4 kB 00:00:00 updates | 3.4 kB 00:00:00 (1/4): base/7/x86_64/group_gz | 166 kB 00:00:25 ...//省略部分内容... 验证中 : rpcbind-0.2.0-47.el7.x86_64 1/2 验证中 : rpcbind-0.2.0-42.el7.x86_64 2/2 更新完毕: rpcbind.x86_64 0:0.2.0-47.el7 完毕! [[email?protected] ~]# systemctl enable nfs //设置开机自启动 Created symlink from /etc/systemd/system/multi-user.target.wants/nfs-server.service to /usr/lib/systemd/system/nfs-server.service. [[email?protected] ~]# systemctl enable rpcbind //设置开启自启动 Created symlink from /etc/systemd/system/multi-user.target.wants/rpcbind.service to /usr/lib/systemd/system/rpcbind.service. 4、编辑NFS服务配置文件,并启动服务,查看服务是否启用;关闭防火墙与增强性安全功能;然后使用命令查看服务是否提供出去。 [[email?protected] ~]# vim /etc/exports //编辑共享服务配置文件 /mnt 192.168.144.0/24(rw,sync,no_root_squash) //配置共享磁盘,可使用的网段信息,可读可写权限,同步信息,不用降级处理 ~ ~ ~ :wq //保存退出 [[email?protected] ~]# systemctl start nfs //启动服务 [[email?protected] ~]# systemctl start rpcbind //启动服务 [[email?protected] ~]# netstat -ntap | grep rpc //查看服务是否启动 tcp 0 0 0.0.0.0:20048 0.0.0.0:* LISTEN 3774/rpc.mountd tcp 0 0 0.0.0.0:37286 0.0.0.0:* LISTEN 3773/rpc.statd tcp6 0 0 :::20048 :::* LISTEN 3774/rpc.mountd tcp6 0 0 :::52041 :::* LISTEN 3773/rpc.statd //成功启动 [[email?protected] ~]# systemctl stop firewalld.service //关闭防火墙 [[email?protected] ~]# setenforce 0 //关闭增强性安全功功能 [[email?protected] ~]# showmount -e //查看服务是否提供 Export list for tast01: /mnt 192.168.144.0/24 //成功提供服务 5、在客户机中关闭防火墙功能与增强性安全功能,因为要使用客户端提供网站服务,方便我们访问网站,然后再安装http服务。 [[email?protected] ~]# systemctl stop firewalld.service [[email?protected] ~]# setenforce 0 [[email?protected] ~]# yum install httpd -y 已加载插件:fastestmirror,langpacks Loading mirror speeds from cached hostfile * base: mirrors.163.com * extras: mirrors.163.com * updates: mirrors.cn99.com 正在解决依赖关系 --> 正在检查事务 ---> 软件包 httpd.x86_64.0.2.4.6-89.el7.centos.1 将被 安装 ...//省略部分内容... 已安装: httpd.x86_64 0:2.4.6-89.el7.centos.1 作为依赖被安装: apr.x86_64 0:1.4.8-3.el7_4.1 apr-util.x86_64 0:1.5.2-6.el7 httpd-tools.x86_64 0:2.4.6-89.el7.centos.1 mailcap.noarch 0:2.1.41-2.el7 完毕! 6、客户端http服务站点要使用的是服务器中添加的磁盘来存储网站信息,在客户端中将服务器添加的磁盘设置自动挂载到http服务站点中。 [[email?protected] ~]# vim /etc/fstab //编辑自动挂载配置文件 # # /etc/fstab # Created by anaconda on Sat Aug 10 03:42:29 2019 # # Accessible filesystems,mount(8) and/or blkid(8) for more info # UUID=729c9a26-dfdc-40f9-ae91-1ade55be51bb / xfs defaults 0 0 UUID=9559d8d9-8f6a-4adb-a41f-02862b167946 /boot xfs defaults 0 0 UUID=5ed35562-b598-43e0-8f8a-db788aa06d40 /home xfs defaults 0 0 UUID=bcc2cc5c-4f4e-4e1d-b4e1-245cfed5cf9d swap swap defaults 0 0 192.168.144.133:/mnt /var/www/html nfs defaults,_netdev 0 0 //添加自动挂载条目 ~ ~ ~ :wq //保存退出 [[email?protected] ~]# mount -a //重新加载挂载信息 [[email?protected] ~]# df -hT 文件系统 类型 容量 已用 可用 已用% 挂载点 /dev/sda2 xfs 20G 3.4G 17G 17% / devtmpfs devtmpfs 898M 0 898M 0% /dev tmpfs tmpfs 912M 0 912M 0% /dev/shm tmpfs tmpfs 912M 9.0M 903M 1% /run tmpfs tmpfs 912M 0 912M 0% /sys/fs/cgroup /dev/sda5 xfs 10G 37M 10G 1% /home /dev/sda1 xfs 6.0G 174M 5.9G 3% /boot tmpfs tmpfs 183M 12K 183M 1% /run/user/42 tmpfs tmpfs 183M 0 183M 0% /run/user/0 192.168.144.133:/mnt nfs4 40G 33M 40G 1% /var/www/html //成功挂载 7、在http服务站点中编辑index.html文件,然后启用http服务。 [[email?protected] ~]# cd /var/www/html/ //进入站点 [[email?protected] html]# ls //查看是否有文件 [[email?protected] html]# vim index.html //编辑index.html文件 <h1>this is nfs web </h1> //编辑内容 ~ ~ ~ :wq //保存退出 [[email?protected] html]# cat index.html //查看index.html内容 <h1>this is nfs web </h1> //显示内容信息 [[email?protected] html]# systemctl start httpd //启用http服务 8、在宿主机中访问客户机搭建的http网站,看是否成功搭建服务。
9、回到服务器中查看mnt目录下是否有我们编辑的index.html文件,然后查看文件内容是否是我们编辑的内容。 [[email?protected] ~]# cd /mnt //进入mnt目录 [[email?protected] mnt]# ls //查看目录内容 index.html //显示我们创建的文件 [[email?protected] mnt]# cat index.html //查看文件内容 <h1>this is nfs web </h1> //显示我们编写的内容 注意:当正在使用NFS功能时服务器宕机,这个时候使用客户机操作时会出现卡机现象,无法完成操作,我们就需要开启一个新的客户机终端,把挂载在http服务站点的磁盘解除掉就可以正常操作了,在新的终端中解除挂载时切记不可使用tab键补全目录信息,一定要手打,若用tab键补全操作还是会卡机,切记!!!切记!!!(编辑:李大同) 【声明】本站内容均来自网络,其相关言论仅代表作者个人观点,不代表本站立场。若无意侵犯到您的权利,请及时与联系站长删除相关内容! |