XFire WebService开发快速起步
发布时间:2020-12-17 01:18:25 所属栏目:安全 来源:网络整理
导读:XFire WebService开发快速起步 ? 环境: XFire-1.2.6 JDK1.5 MyEclipse 6.5 Tomcat-5.5.27 Windows XP Professional简体中文版 ? 软件下载地址: [url]http://repository.codehaus.org/org/codehaus/xfire/xfire-distribution/1.2.6/xfire-distribution-1.2.
|
XFire WebService开发快速起步
?
环境:
XFire-1.2.6
JDK1.5
MyEclipse 6.5
Tomcat-5.5.27
Windows XP Professional简体中文版
?
软件下载地址:
[url]http://repository.codehaus.org/org/codehaus/xfire/xfire-distribution/1.2.6/xfire-distribution-1.2.6.zip[/url]
[url]http://apache.mirror.phpchina.com/tomcat/tomcat-5/v5.5.27/bin/apache-tomcat-5.5.27.zip[/url]
?
有关WebService的概念、原理、数据发现、描述、绑定等过程、方式也不说了。这里就只关注如何快速开发出来一个通用的、易懂的Hello World例子。
?
以下是开发步骤:
?
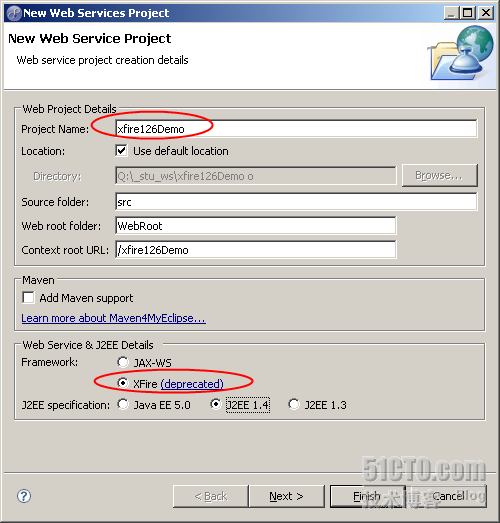
1、创建工程
?
打开MyEclipse 6.5,新建一个WebService工程。如下图
?
?
然后一路next,直到完成。
?
创建完成后,打开生成的web.xml文件,可以看到,XFire已经配置好了。
<?
xml
version
="1.0"
encoding
="UTF-8"
?>
< web-app xmlns ="http://java.sun.com/xml/ns/javaee" xmlns:xsi ="http://www.w3.org/2001/XMLSchema-instance" version ="2.5" xsi:schemaLocation ="http://java.sun.com/xml/ns/javaee???? [url]http://java.sun.com/xml/ns/javaee/web-app_2_5.xsd[/url]" > ???? < servlet > ???????? < servlet-name >XFireServlet </ servlet-name > ???????? < servlet-class >org.codehaus.xfire.transport.http.XFireConfigurableServlet </ servlet-class > ???????? < load-on-startup >0 </ load-on-startup > ???? </ servlet > ???? < servlet-mapping > ???????? < servlet-name >XFireServlet </ servlet-name > ???????? < url-pattern >/services/* </ url-pattern > ???? </ servlet-mapping > ???? < welcome-file-list > ???????? < welcome-file >index.jsp </ welcome-file > ???? </ welcome-file-list > </ web-app >
?
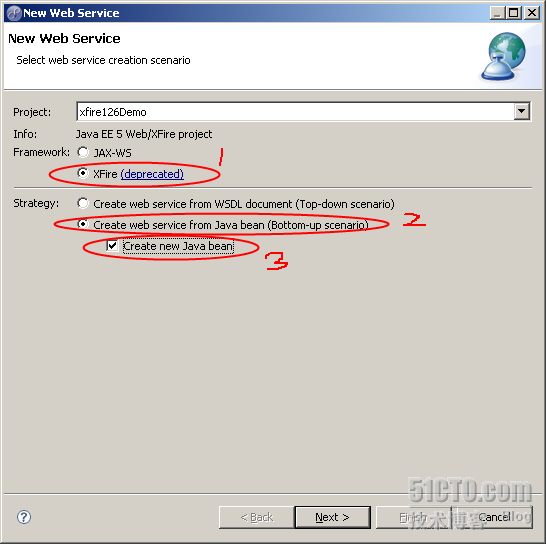
2、创建WebService服务
?
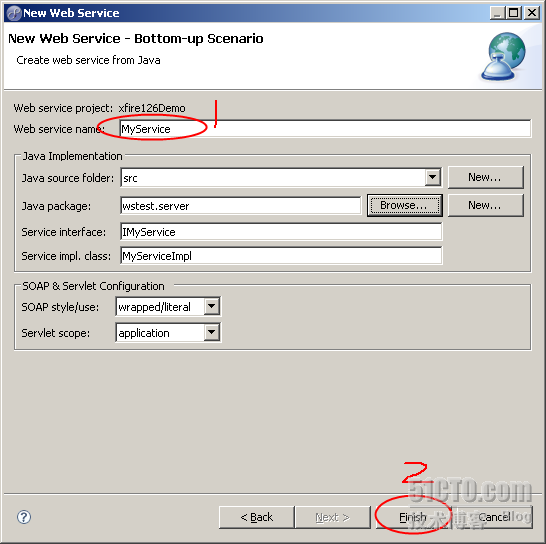
创建两个个包“wstest.server”和“wstest.client”,用来保存服务端和客户端程序。然后开始创建服务端程序,如下图
?
?
?
完成后,生成了一个Service的配置services.xml:
?
<?
xml
version
="1.0"
encoding
="UTF-8"
?>
< beans xmlns ="http://xfire.codehaus.org/config/1.0" > ?? < service > ???? < name >MyService </ name > ???? < serviceClass >wstest.server.IMyService </ serviceClass > ???? < implementationClass > ??????wstest.server.MyServiceImpl ???? </ implementationClass > ???? < style >wrapped </ style > ???? < use >literal </ use > ???? < scope >application </ scope > ?? </ service > </ beans >
?
也生成了接口和默认实现,改写后如下:
package wstest.server;
//Generated by MyEclipse public interface IMyService { ???? ?? public String sayHello(String user); ???? }
?
package wstest.server;
//Generated by MyEclipse public class MyServiceImpl implements IMyService { ???? ?? public String sayHello(String user) { ???? return "您好,"+user; ??} ???? }
?
至此,服务端代码已经完成。
?
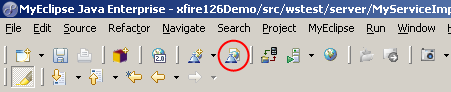
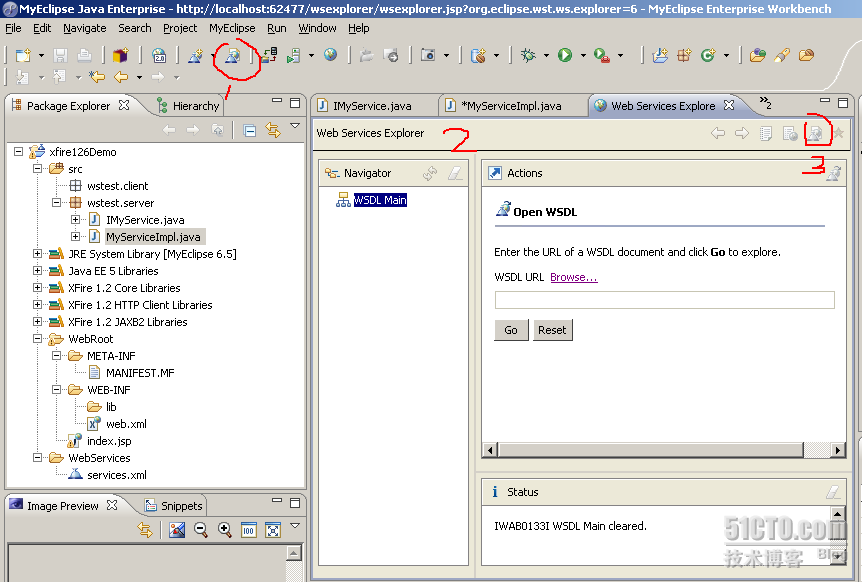
3、测试服务端代码
?
测试依赖与Servlet容器Tomcat,需要将做好的服务端打包部署到tomcat上,然后启动。才可以进行测试。假设你已经配置了Tomcat服务器,并完成了WebService服务端的部署。那么,现在就启动Tomcat,然后:
?
?
?
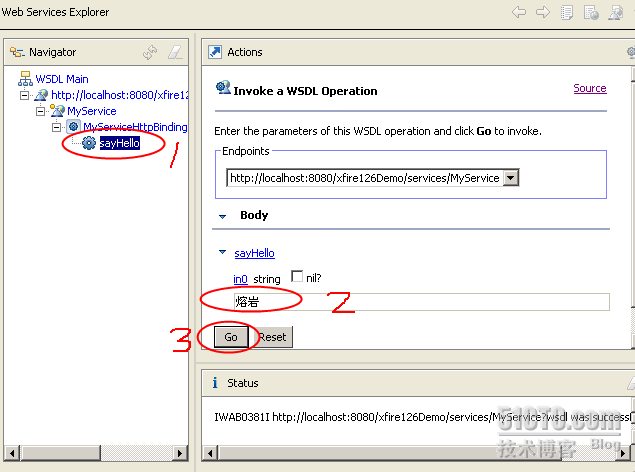
输入访问地址:
[url]http://localhost:8080/xfire126Demo/services/MyService?wsdl[/url]? ,然后go一把!
?
?
?
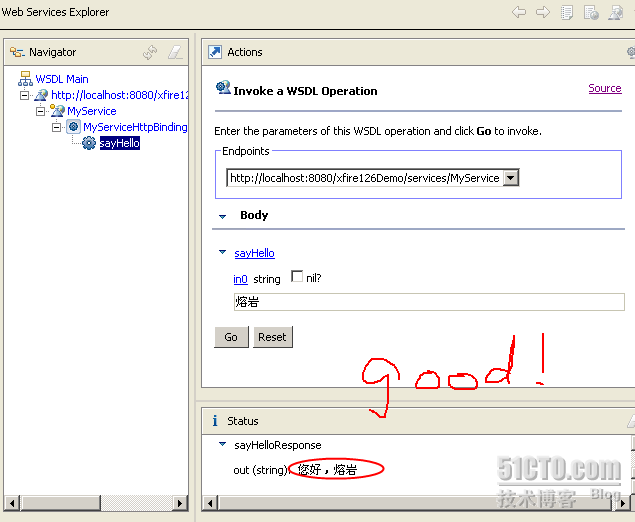
这样,出现上上面的结果,表明测试成功了。
?
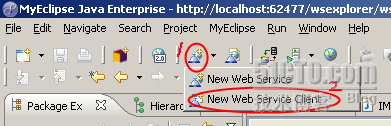
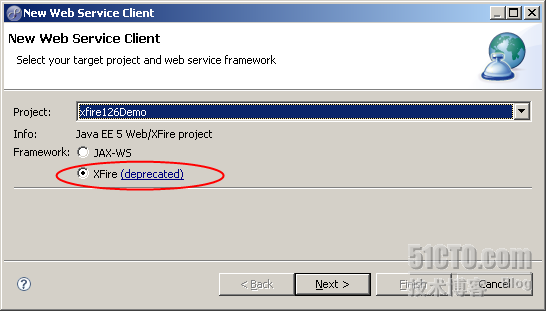
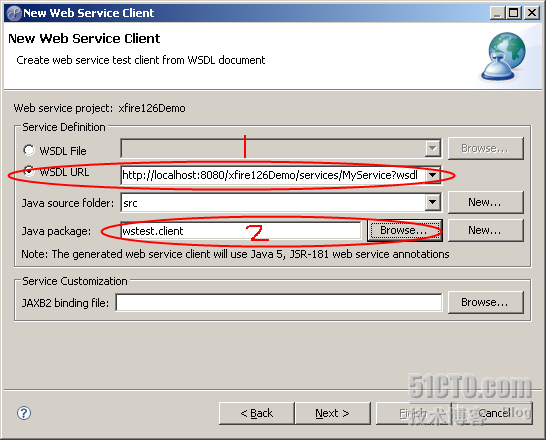
4、生成客户端代码
?
?
?
?
?
很郁闷,这个生成的客户端代码一部分跑到服务端的包里面了。真是垃圾,rubbish!!!
?
但是,这就是MyEclipse的功能,我改变不了。
?
5、客户端测试
?
下面就耐心看怎么用这个客户端代码。
打开生成的代码如下:
package wstest.client; import java.net.MalformedURLException; import java.util.Collection; import java.util.HashMap; import javax.xml.namespace.QName; import org.codehaus.xfire.XFireRuntimeException; import org.codehaus.xfire.aegis.AegisBindingProvider; import org.codehaus.xfire.annotations.AnnotationServiceFactory; import org.codehaus.xfire.annotations.jsr181.Jsr181WebAnnotations; import org.codehaus.xfire.client.XFireProxyFactory; import org.codehaus.xfire.jaxb2.JaxbTypeRegistry; import org.codehaus.xfire.service.Endpoint; import org.codehaus.xfire.service.Service; import org.codehaus.xfire.soap.AbstractSoapBinding; import org.codehaus.xfire.transport.TransportManager; public class MyServiceClient { ???????? private static XFireProxyFactory proxyFactory = new XFireProxyFactory(); ???????? private HashMap endpoints = new HashMap(); ???????? private Service service0; ???????? public MyServiceClient() { ????????????????create0(); ????????????????Endpoint MyServicePortTypeLocalEndpointEP = service0 .addEndpoint( new QName( "http://server.wstest","MyServicePortTypeLocalEndpoint"),new QName("http://server.wstest","MyServicePortTypeLocalBinding"),"xfire.local://MyService"); ????????????????endpoints.put(new QName("http://server.wstest",MyServicePortTypeLocalEndpointEP); ????????????????Endpoint MyServiceHttpPortEP = service0 .addEndpoint(new QName("http://server.wstest","MyServiceHttpPort"),"MyServiceHttpBinding"),"http://localhost:8080/xfire126Demo/services/MyService"); ????????????????endpoints.put(new QName("http://server.wstest",MyServiceHttpPortEP); ????????} ????????public Object getEndpoint(Endpoint endpoint) { ????????????????try { ????????????????????????return proxyFactory.create((endpoint).getBinding(),(endpoint).getUrl()); ????????????????} catch (MalformedURLException e) { ????????????????????????throw new XFireRuntimeException("Invalid URL",e); ????????????????} ????????} ????????public Object getEndpoint(QName name) { ????????????????Endpoint endpoint = ((Endpoint) endpoints.get((name))); ????????????????if ((endpoint) == null) { ????????????????????????throw new IllegalStateException("No such endpoint!"); ????????????????} ????????????????return getEndpoint((endpoint)); ????????} ????????public Collection getEndpoints() { ????????????????return endpoints.values(); ????????} ????????private void create0() { ????????????????TransportManager tm = (org.codehaus.xfire.XFireFactory.newInstance().getXFire().getTransportManager()); ????????????????HashMap props = new HashMap(); ????????????????props.put("annotations.allow.interface",true); ????????????????AnnotationServiceFactory asf = new AnnotationServiceFactory(new Jsr181WebAnnotations(),tm,new AegisBindingProvider(new JaxbTypeRegistry())); ????????????????asf.setBindingCreationEnabled(false); ????????????????service0 = asf.create((wstest.client.MyServicePortType.class),props); ????????????????{ ????????????????????????AbstractSoapBinding soapBinding = asf.createSoap11Binding(service0,new QName("http://server.wstest","http://schemas.xmlsoap.org/soap/http"); ????????????????} ????????????????{ ????????????????????????AbstractSoapBinding soapBinding = asf.createSoap11Binding(service0,"urn:xfire:transport:local"); ????????????????} ????????} ????????public MyServicePortType getMyServicePortTypeLocalEndpoint() { ????????????????return ((MyServicePortType)(this).getEndpoint(new QName("http://server.wstest","MyServicePortTypeLocalEndpoint"))); ????????} ????????public MyServicePortType getMyServicePortTypeLocalEndpoint(String url) { ????????????????MyServicePortType var = getMyServicePortTypeLocalEndpoint(); ????????????????org.codehaus.xfire.client.Client.getInstance(var).setUrl(url); ????????????????return var; ????????} ????????public MyServicePortType getMyServiceHttpPort() { ????????????????return ((MyServicePortType)(this).getEndpoint(new QName("http://server.wstest","MyServiceHttpPort"))); ????????} ????????public MyServicePortType getMyServiceHttpPort(String url) { ????????????????MyServicePortType var = getMyServiceHttpPort(); ????????????????org.codehaus.xfire.client.Client.getInstance(var).setUrl(url); ????????????????return var; ????????} ????????public static void main(String[] args) { ???????????????? ????????????????MyServiceClient client = new MyServiceClient(); ???????????????? ????//create a default service endpoint ????????????????MyServicePortType service = client.getMyServiceHttpPort(); ???????????????? ????//TODO: Add custom client code here ????????????????????// ????????????????????//service.yourServiceOperationHere(); ???????????????? ????System.out.println("test client completed"); ????????????????????System.exit(0); ????????} }
?
看得很晕,不知道啥意思,但是从“TODO”标记处,我知道了:
????
//TODO: Add custom client code here
???????????????????? // ???????????????????? //service.yourServiceOperationHere();
?
现在就在这里添加测试代码吧:
????
//TODO: Add custom client code here
???????????????????? // ???????????????????? //service.yourServiceOperationHere(); ????????????????String helloString = service.sayHello( "熔岩"); ????????????????System.out.println(helloString);
?
添加了很傻蛋的两行代码后,就可以运行起来看看测试代码了。
(编辑:李大同) 【声明】本站内容均来自网络,其相关言论仅代表作者个人观点,不代表本站立场。若无意侵犯到您的权利,请及时与联系站长删除相关内容! |