webservice 笔记(小结) axis2 集成spring 发布服务
发布时间:2020-12-17 01:17:21 所属栏目:安全 来源:网络整理
导读:学习了一段时间的webservice,今天有空,稍微总结一下。 首先我们选的是axis2-1.4 +myeclipse6.5+tomcat 6.0,大家肯定不陌生了。我们以前都是把从官网上下载的war包考到tomcat的webapps下,但是现在我们自己建一个web项目 1、首先建立一个web工程,名字叫We
|
学习了一段时间的webservice,今天有空,稍微总结一下。
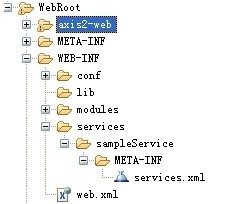
首先我们选的是axis2-1.4 +myeclipse6.5+tomcat 6.0,大家肯定不陌生了。我们以前都是把从官网上下载的war包考到tomcat的webapps下,但是现在我们自己建一个web项目 1、首先建立一个web工程,名字叫WebService, 2、把相应的axis2的jar文件考到WEB-INF的lib下 3、 在项目的WebRoot下的目录结构要和以前用war包是的目录结构一样(否则可能就要报 错了) ??? 目录结构如图所示
4、在src下建立package sample.service
5、建立提供服务的接口 ? package sample.service;
/**
?* 定义服务接口 ?* @author 22222 ?* ?*/ public interface ServiceServer { //定义服务方法 ?public String sayHello(String name); ? }
?
?实现类:
?
package sample.service;
public class ServiceServerImpl implements ServiceServer {
?public String sayHello(String name) {
?? ??return "hello"+name; ?}
}
?
6、在src下建立applicationContext.xml文件
?? 配置如下 : <?xml version="1.0" encoding="UTF-8"?> <beans xmlns=" http://www.springframework.org/schema/beans" ?xmlns:xsi=" http://www.w3.org/2001/XMLSchema-instance" ?xmlns:aop=" http://www.springframework.org/schema/aop" ?xmlns:tx=" http://www.springframework.org/schema/tx" ?xsi:schemaLocation=" http://www.springframework.org/schema/beans http://www.springframework.org/schema/beans/spring-beans-2.0.xsd ?????????? http://www.springframework.org/schema/aop http://www.springframework.org/schema/aop/spring-aop-2.0.xsd ?????????? http://www.springframework.org/schema/tx http://www.springframework.org/schema/tx/spring-tx-2.0.xsd">
?
<bean id="SayHelloService" class="sample.service.ServiceServerImpl">
</bean> </beans>
?
?
7、在WebRoor/WEB-INF/services/目录下建立目录sampleService(这个名字可以随便取)
?? 然后建立在其下META-INF目录,然后再在其目录下建立services.xml 目录结构如下
?
?
?
?
?
services.xml的内容如下:
?
<?xml version="1.0" encoding="UTF-8"?>
<service name="HelloWorld"> ??<description>web service</description> ??<parameter name="ServiceObjectSupplier"> ???org.apache.axis2.extensions.spring.receivers.SpringServletContextObjectSupplier ??</parameter> ??<parameter name="SpringBeanName">SayHelloService</parameter> //SpringBeanName名字是固定的不能改 //SayHelloService是spring中注册的实现类的id(这个大家肯定很清楚了) ? ?<operation name="sayHello"> ???<messageReceiver ????class="org.apache.axis2.rpc.receivers.RPCMessageReceiver" /> ??</operation>
</service>
?
8、现在要配置一下web.xml了
? 内容如下:
?
<?xml version="1.0" encoding="UTF-8"?>
<web-app version="2.5" ?xmlns=" http://java.sun.com/xml/ns/javaee" ?xmlns:xsi=" http://www.w3.org/2001/XMLSchema-instance" ?xsi:schemaLocation=" http://java.sun.com/xml/ns/javaee ? http://java.sun.com/xml/ns/javaee/web-app_2_5.xsd"> ? ?<servlet> ??????? <servlet-name>AxisServlet</servlet-name> //注册axis2的servlet ??????? <servlet-class>org.apache.axis2.transport.http.AxisServlet</servlet-class> ??????? <load-on-startup>1</load-on-startup> ??? </servlet> ??????? ??? <servlet-mapping> ??????? <servlet-name>AxisServlet</servlet-name> ??????? <url-pattern>/services/*</url-pattern> ??? </servlet-mapping> //加载spring的配置文件 ?<context-param> ????? <param-name>contextConfigLocation</param-name>
????? <param-value>classpath*:applicationContext.xml</param-value>
?</context-param> //增加spring监听器 ?<listener> ??????? <listener-class>org.springframework.web.context.ContextLoaderListener</listener-class> ?</listener> </web-app>
?
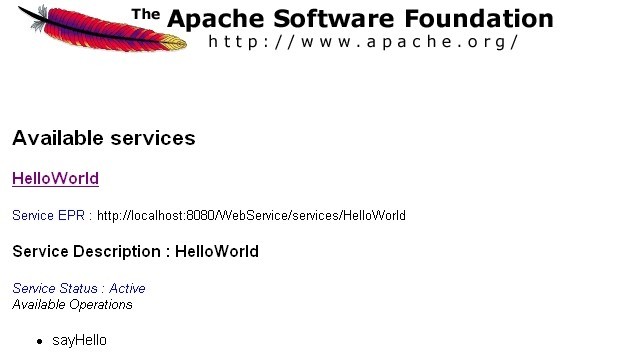
?9、启动tomcat 在浏览器中输入
http://localhost:8080/WebService/services/listServices
可以看到一下内容说明我们的服务已经发布成功了
?
可以查看wsdl 待会就是访问我们的服务了(用axis2 的eclipse 插件自动生成客户端)
(编辑:李大同) 【声明】本站内容均来自网络,其相关言论仅代表作者个人观点,不代表本站立场。若无意侵犯到您的权利,请及时与联系站长删除相关内容! |