树莓派 Raspberry Pi 4,.net core 3.0 ,Avalonia UI 开发
|
虽说.net core3.0已经可以用于开发wpf和winform程序,可是遗憾的时目前这core下的wpf还是只能运行在windows下,想要在linux下运行wpf估计还要等一段时间。 Avaloniaui :直接用官网的一句话来描述吧:A cross platform XAML Framework for .NET Framework,.NET Core and Mono 在树莓派 4 B上允许Avaloniaui 简单的步骤:第一步: 烧录树莓派最新的系统Raspbian ,最新的Raspbian 下载地址 第二步: Install? sudo apt-get install curl libunwind8 gettext apt-transport-https 下载.net core 3.0? arm32 运行时 最新的下载地址 curl -sSL -o dotnet.tar.gz https://download.visualstudio.microsoft.com/download/pr/0c5e013b-fa57-44dc-85bf-746885181278/58647e532fcc3a45209c13cdfbf30c74/dotnet-runtime-3.0.0-linux-arm.tar.gz 创建dotnet解压的目录 sudo mkdir -p /opt/dotnet && sudo tar zxf dotnet.tar.gz -C /opt/dotnet 创建环境变量地址软链接 sudo ln -s /opt/dotnet/dotnet /usr/local/bin 在终端中检测 dotnet core环境是否配置完成 dotnet
? 第三步: 参考官方在win10上创建一个 avalonia 的项目。
安装作者分钟的在 arm32 linux机器上编译后的skia包 ? https://www.nuget.org/packages/Avalonia.Skia.Linux.Natives/1.68.0.2 PM> Install-Package Avalonia.Skia.Linux.Natives -Version 1.68.0.2 ? 打开MainWindow.xaml在页面上加几个按钮和文本 <StackPanel>
<TextBlock Text="{Binding Greeting}" HorizontalAlignment="Center" VerticalAlignment="Center"/>
<Button Classes="btn" Command="{Binding Go}" Content="click me"></Button>
<ContentControl Content="{Binding SubContent}"></ContentControl>
</StackPanel>
对应的?MainWindowViewModel.cs namespace wf.ViewModels
{
public class MainWindowViewModel : ViewModelBase
{
private object _subContent;
public string Greeting => "Welcome to Avalonia!";
public object SubContent
{
get => _subContent;
set => this.RaiseAndSetIfChanged(ref _subContent,value);
}
public void Go()
{
SubContent = new Uc();
}
public void Go2()
{
SubContent = new Uc();
}
}
}
其中 UC是一个自定义的控件, <UserControl xmlns="https://github.com/avaloniaui"
xmlns:x="http://schemas.microsoft.com/winfx/2006/xaml"
xmlns:d="http://schemas.microsoft.com/expression/blend/2008"
xmlns:mc="http://schemas.openxmlformats.org/markup-compatibility/2006"
mc:Ignorable="d" d:DesignWidth="800" d:DesignHeight="450"
x:Class="wf.Views.Uc">
<StackPanel>
<TextBlock Text="我是子控件" HorizontalAlignment="Center" VerticalAlignment="Center"/>
<Button Content="biubiubiu"></Button>
<Calendar></Calendar>
</StackPanel>
</UserControl>
在window上按F5运行程序,如下图所示
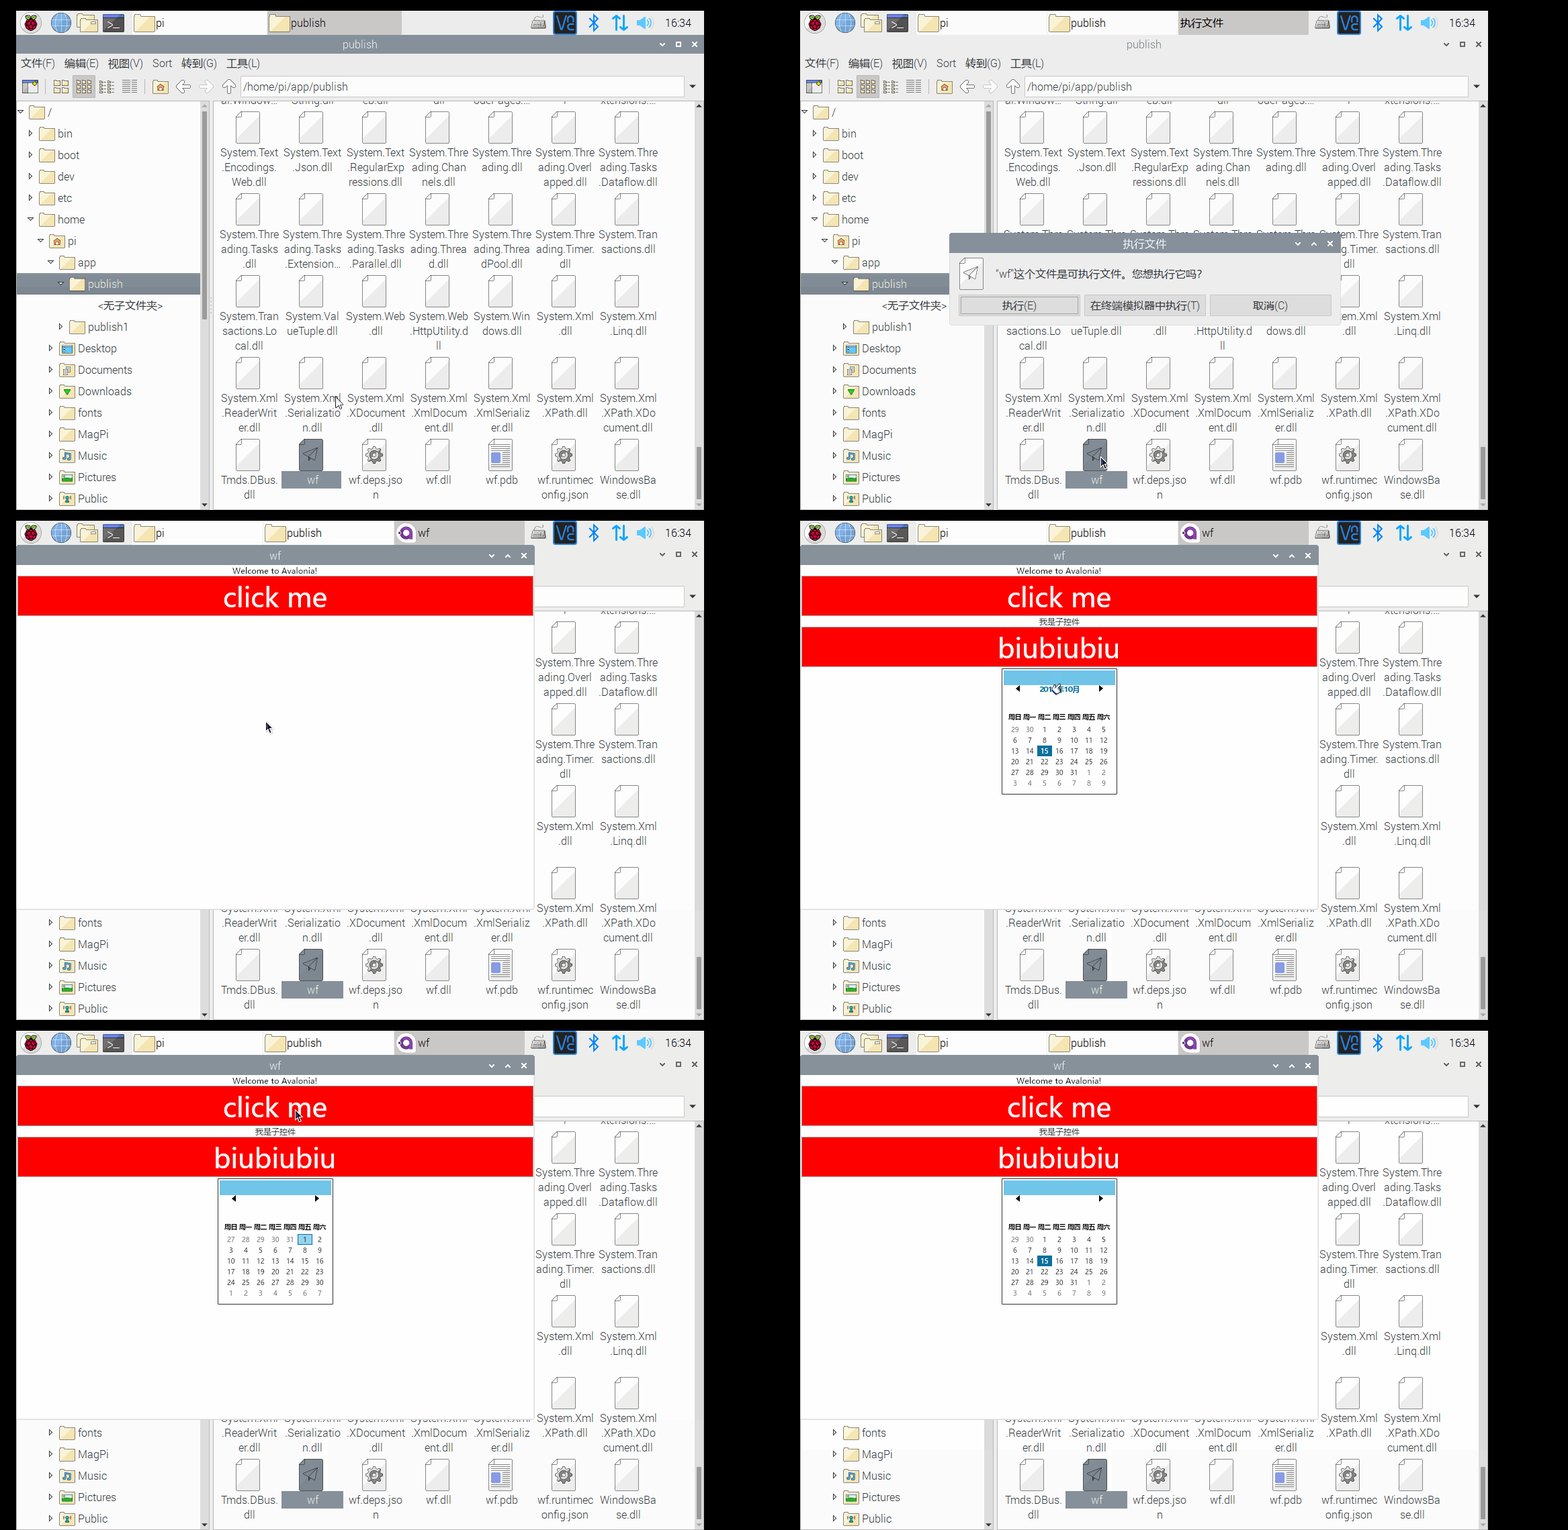
cmd到项目根目录输入如下命令完成 linux下的项目发布 dotnet publish -r linux-arm -f netcoreapp3.0 把?binDebugnetcoreapp3.0linux-arm 下的 publish 上传到树莓派上,在树莓派终端打开输入如下命令 chmod +x publish/xxx ./xxx 稍等片刻会打开窗体,但是发现窗体上的文字没有被渲染出来,如下所示
? ?经过在作者github上的询问得知 是因为字体问题,我不知道avalonia ui用的什么字体,但是我们可以全局修改它的字体,具体步骤如下: ssh到树莓派执行如下命令安装微软的字体。这里我们主要使用的是微软雅黑的字体 sudo apt-get install ttf-mscorefonts-installer 打开项目的App.Xam参考下面的代码修改 <Application xmlns="https://github.com/avaloniaui"
xmlns:x="http://schemas.microsoft.com/winfx/2006/xaml"
xmlns:local="clr-namespace:wf"
x:Class="wf.App">
<Application.DataTemplates>
<local:ViewLocator/>
</Application.DataTemplates>
<Application.Resources>
<FontFamily x:Key="yh">微软雅黑</FontFamily>
</Application.Resources>
<Application.Styles>
<StyleInclude Source="avares://Avalonia.Themes.Default/DefaultTheme.xaml"/>
<StyleInclude Source="avares://Avalonia.Themes.Default/Accents/BaseLight.xaml"/>
<Style Selector="Window">
<Setter Property="FontFamily" Value="{StaticResource yh}"></Setter>
</Style>
</Application.Styles>
</Application>
重新编译,发送的树莓派上执行,即可打开窗口,毕业字体也可以渲染出来。
? ? 如果字体还是没有渲染出来,建议把windows下的微软雅黑的字体拷贝到linux上安装: ? 1、到win10下复制字体(C:WindowsFonts) 2、将要的字体复制到?/usr/share/fonts/chinese/TrueType?目录下 (su cp /fonts/* //usr/share/fonts/chinese/TrueType/*) 3、修改字体权限,使root以外的用户可以使用这些字体。 4、建立字体缓存,命令:cd /usr/share/fonts/chinses/TrueType mkfontscale 5、重启,即可使用。 (编辑:李大同) 【声明】本站内容均来自网络,其相关言论仅代表作者个人观点,不代表本站立场。若无意侵犯到您的权利,请及时与联系站长删除相关内容! |


